
The previous article More Workshoppery Storage covered updates to the workshop. Now lets get back to working on the car.
When I got the Imperial the heater blower was dead. No matter how the switches were set the fan didn’t move – didn’t even twitch! So “make the heater blow” was added to the (steadily growing) list of tasks.
When doing repairs on the firewall I had to pull the heater plenum out. This was convenient, as pulling the plenum is the first step in checking and replacing the fan motor.
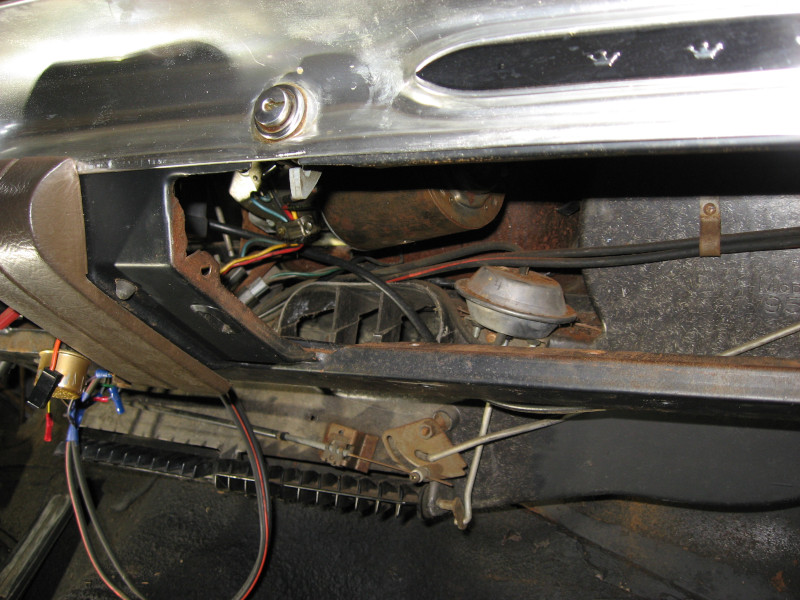
With the plenum on the workbench undoing three bolts removed the motor. The motor was shot – almost locked up and plenty of play in the bearings. Directly applying 12V to the motor leads produced no movement. OK, need a new motor.
Which lead to the usual situation: New motors aren’t available. 60 year old used motors probably aren’t in much better shape. Fortunately, the Internet had an article claiming that a compatible motor had been used on certain heavy trucks through the mid-1980’s and had a part number for it. I tracked down the part number online, ordered one, and put it on the shelf (this was two years ago).
It was now time to re-install the HVAC system. I found the plenum (with new motor installed!), hoses, and other miscellaneous pieces and laid them out on the workbench.
First step: check voltage on the connector to the blower motor. Yup, 0 volts – just like the last time I checked two years ago. Print out copies of the wiring diagrams from the factory service manual, dig out a set of colored pencils, and start identifying and tracing the wiring.
It quickly became obvious that a job I dreaded was required: remove the heater control switch from the dashboard. On most cars – at least most cars of the era – the heater control switch is fairly accessible. On the 1963 Imperial it is buried in one of the instrument panel wings. Deeply buried.
After donating modest amounts of blood while blindly fumbling deep into the unfinished sheetmetal in the back of the dash I had the switch out and on the workbench.
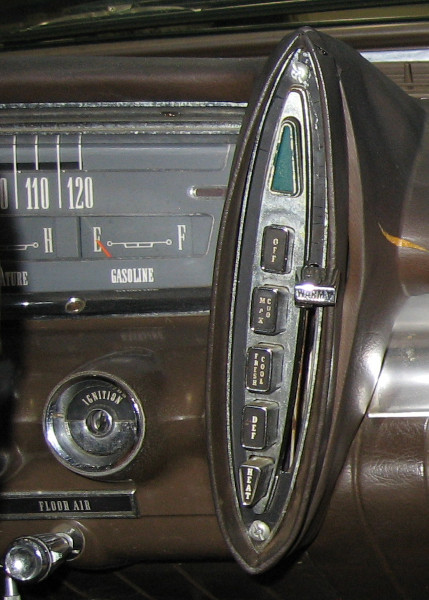
There are 5 electrical connectors on the back of the switch, in addition to 7 vacuum lines. The switch controls power to the the blower motor as well as the AC compressor. A separate switch, built into the WARM lever on the right side of the wing, controls the blower speed. The question was what controlled what, what worked, and what was broken? The blower speed switch was fairly obvious: after applying electrical contact cleaner it worked properly.
The main heater switch, on the other hand, didn’t make sense. I ended up creating a spreadsheet and checking connectivity between all possible combinations of the 5 electrical terminals and mapping this to the wiring diagram. It wasn’t clear from the wiring diagram exactly everything was connected, but it looked like the part that controlled blower power was dead.
At this point, looking through a different part of the factory service manual, I found the diagram I was looking for that explained everything:
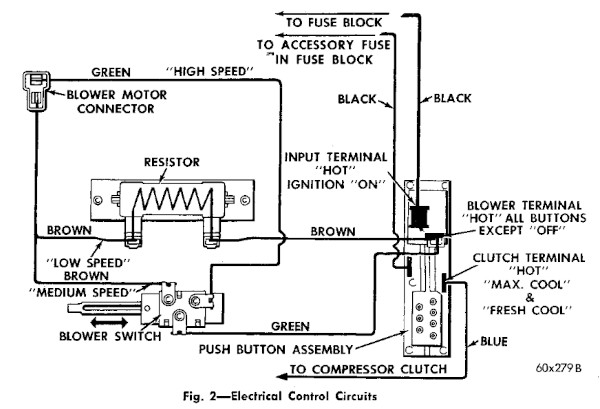
With this diagram everything made sense. There are two separate power leads going directly to the fuse box and two separate circuits: one for the AC compressor and one for the blower motor. With the testing that I had done it was clear that the blower motor circuit was indeed stone cold dead. A new switch was needed.
To repeat an overly familiar refrain, this part is no longer available. 60 year old used parts will be questionable. A check of Ebay showed that some NOS (New Old Stock, 60 year old unused parts) were available. For $300-$500.
More searching on the Internet showed that this basic switch had been used in many Chrysler cars for almost 20 years. There were about ten different part numbers that were (largely) compatible. Time to start searching on all the different part numbers. Amazingly there is an OER – Original Equipment Reproduction – part available! An OER part is one that is a new reproduction of an old part that is an exact replacement. This part, OER-3895790, was actually available from multiple sources and was “only” $120.
When the new switch showed up I grabbed the multimeter and tested it. Power for both compressor and blower motor on exactly the pins indicated from the electrical diagram!
Re-assemble the switch plate and re-install it in the dashboard. Again with only a modest donation of blood. Hook up all of the electrical connections, grab the multimeter, and check voltage at the blower motor connector. Zero volts.
What The?!? Oh, right, the car has to be turned on. Dig out keys, turn car on, and check again. Zero volts.
Again, What The?!? Oh, right, the heater switch is OFF. Punch in AC and try again. 12V on the AC compressor and 0V on the blower motor.
OK, back to basics. Unplug the connectors to the switch and check supply voltage to the switch. 12V on AC compressor and 0V on blower motor. Krud, time to troubleshoot the wiring harness.
Since this wire is supposed to go directly to the fusebox there shouldn’t be any chance for a problem. The fuse checked out as good, so time to drop the fusebox. And look at wire C1, Black with a White Tracer, power for blower motor, hanging in mid air. It had pulled out of the fusebox. I recalled that this wire had been tight with I re-wired the fusebox. Apparently too tight. OK, splice in a 6″ extension and re-connect to the fusebox.
Now back to the blower connector: with Car ON and heater switch in AC I now had 12V on both AC compressor and blower motor! Next step, temporarily connect the blower motor and check it. It spins! In LOW, MEDIUM, and HI! Check all of the settings on the switch: Off, MaxAC, FreshAC, Heat and defrost – all work as they should. And there was much rejoicing!
As a bonus, one of the problems with the heater was that the buttons weren’t illuminated. There is an electro-luminescent (WL) panel next to the buttons that is supposed to light them up. The one on the opposite side of the dash for the transmission buttons worked, but the heater didn’t light up. I checked the power for the EL panel, and it showed 132V AC (should be 200V, but that is a topic for another day). When I pulled the switch assembly out I discovered that the connector for the EL panel wasn’t plugged in. OK, this is too easy, but I’ll try it anyway. Plug the connector back in, turn the lights on, and the panel glows! Easiest repair yet. I’m still waiting for the other shoe to fall.
Re-installing the heater plenum and reconnecting the vacuum lines were merely difficult. I need to check correct operation of the vacuum operated heater doors, but will save that for a warmer day.
Check this one off the list and move on to the AC plumbing under the hood.
Workshop Note
The temperature the last few weeks has ranged from near zero to the low 30’s. The workshop is now a comfortable place to work! I’m setting the heat low at night, allowing it to drop down to 38-40 degrees, and turning it up in the morning. It takes a couple of hours to get to a comfortable level, and then maintains that temperature with no difficulty. I keep it in the mid to high 50’s while working. No more complaints about winter in the workshop!