
After (finally!) getting the alternator and voltage regulator straightened out in Electrical 10: 2 Bad let’s look at some of the tools and techniques used.
My approach to making electrical connections has evolved significantly. This will be familiar to many people – most of them will know more about wiring than I do!
The early days
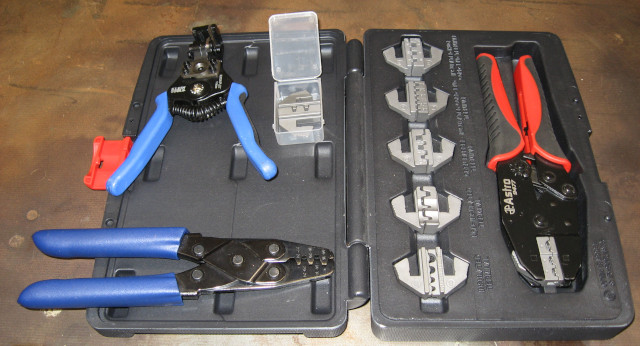
For many years these were my preferred tools.

The only wire I knew was primary wire or hookup wire, purchased at a high price in short rolls from big box stores, or lamp cord. A cheap pair of pliers style tools served to both strip wire and crimp connectors. And the connectors were purchased in convenient cheap assortments.
The wiring pliers were a nuisance for stripping wire – it was far more difficult to get a good strip than it should have been. Also, it was difficult to get good crimps with them. The cheap crimp connectors were light weight and in many cases marginal. The plastic was badly crushed getting a crimp – and you couldn’t tell if you got a good crimp. And they simply looked cheap! Just looking at wiring done with these tools made you think it was a hack job. Often because it was a hack job!
Despite all this, these were my tools for forty years.
The Transition
The combination of the Imperial restoration and a dedicated workshop has lead to a dramatic upgrade in my tools. It has also lead me to learn more about what tools and techniques are available, resulting in significant improvements in my knowledge and skill in many areas. I’m not going to claim to be good, but I will claim to be less bad!
One of the first things electrical I learned about was heat shrink connectors. The cheap connectors I was familiar with did a poor job of sealing, and the only thing holding the connection together was the (often poor) mechanical crimp. The heat shrink connectors were more expensive, but provided a much better seal, a better mechanical connection, and a more professional appearance. But you were still crushing the plastic to make a crimp.

Revelation
The real revelation came when I read the Bodenzord blog series of articles on DIY Bussmann RTMR Fuse Block. This introduced me to a new world of parts, tools, techniques, and sources for materials: GXL automotive wire, Weatherpack and Metri-Pack sealed connectors, Bussmann fuse blocks, real crimpers and automatic wire strippers. The credit card came out and I’ve never looked back!
Terminals
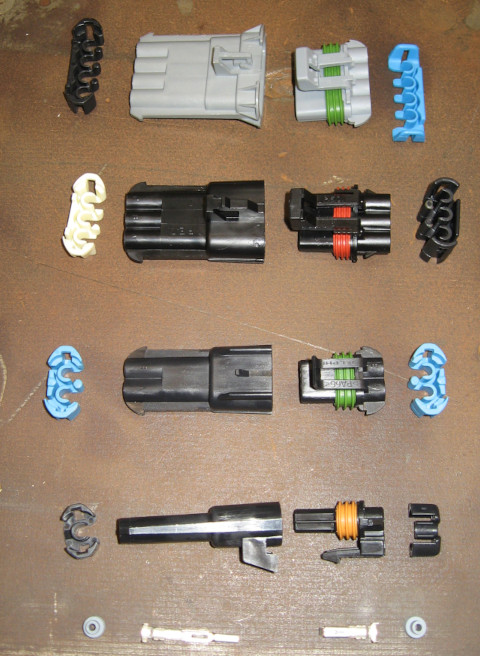
I’ve spent a lot of time talking about corrosion in automotive wiring. The car companies addressed this 30 years ago with sealed connectors which dramatically improved electrical reliability. These connectors have water tight male and female housings, rubber gaskets between the male and female housings, and rubber seals where the wires go into the housings. If water can’t get in it won’t corrode! The connectors crimp both to the bare end of the wire as well as to the insulation, providing a more secure connection.
There are many different styles, but the Bodenzord article recommended the Weatherpack and Metri-Pack connectors which have been widely used on many US cars and which are available at “reasonable” cost. You can get them online from industrial distributors such as Waytek, from Amazon, and from Ebay. You have to be careful with Amazon and Ebay as they are filled with cheap knockoffs, so I mainly use Waytek.
The Metri-Pack 280 series is especially versatile as the female connectors can be directly used with mini-ATA fuses and micro relays. Among other applications, the Bussmann 15XXX series fuse blocks are directly wired with Metri-Pack 280 connectors. This makes it easy to build complex electrical systems. Metri-Pack 280 can handle up to 30 amps of power.
Metri-Pack 280 requires many components: both male and female terminals for various gauges of wire as well as male and female shells and retainer clips for different numbers of terminals. One, two, three, and four terminal shells will cover most uses. You will also need sealing rings for various gauges of wire.
Metri-Pack can quickly get expensive. I decided to build out a custom kit using parts from Waytek as they have some of the best prices for quantity purchases. Waytek has minimum quantities for many of their parts; this can make life a bit complicated when putting together an order. For some parts, like Female Tangless Terminals for 12-14ga wire (used in mass quantities with Bussmann fuse blocks) you really want to order 100-200 at a time. Wiring a single Bussmann fuse box will use 40+ connectors – plus the number consumed for changes and mistakes… Since you will generally have a connector on each end of each wire the numbers quickly add up.
For other parts, like 4 terminal shells, it is difficult to justify ordering 25 at a time. In any case, when assembling a custom kit for working with Metri-Pack 280 it is more cost effective to order what you need than to buy one of the pre-packaged kits.
Wire
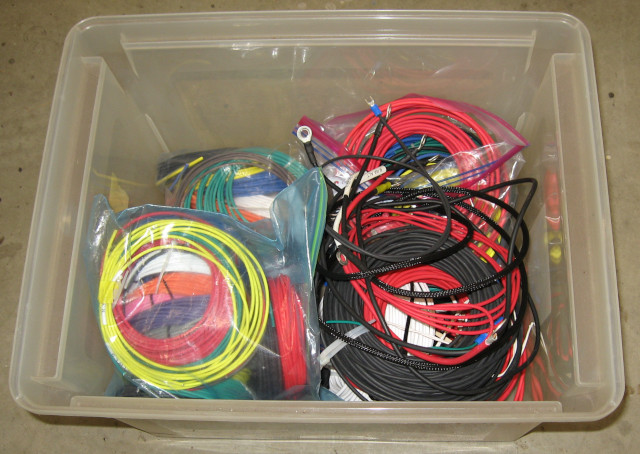
With connectors chosen, what wire to use with them? Car companies specify GXL and TXL wire because the insulation handles high heat, is oil resistant, and resists mechanical abrasion. TXL has thinner insulation and is more flexible while GXL is tougher. I’ve standardized on GXL.
GXL is hard to find and expensive – unless you go online. Even then you are often looking at 500’ or 1,000’ rolls – this gets expensive really fast when you want to put together a foundation of colors and wire size. For working on automotive electrical harnesses in is reasonable to have 6-10 colors of wire in multiple gauges. Do the math and you are quickly looking at 30+ rolls of wire!
Fortunately there is Wire Barn who offer packages of 25’ rolls of GXL wire in 6, 8, 10, or 11 different colors and in sizes ranging from 8ga to 20ga. Multi packs in 12ga, 14ga, and 16ga provide a great starting point for repair work and building wire harnesses. As you use them up you can either replace the colors you use or just buy another multi pack. Add some 100’ rolls in red and black in 10ga, 12ga, and 14ga and you are ready for just about anything.
Wiring Tools
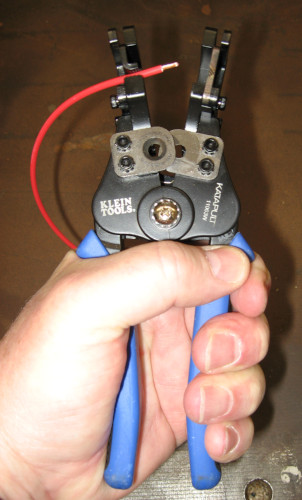
I bought a pair of Klein automatic wire strippers to try out. Ten minutes into my first wiring project using these I was asking “why didn’t I get these 30 years ago?!?” Stick the wire in the tool, squeeze, and you have a perfect strip every time. Strongly recommended!
Looking into better crimpers I discovered ratchet crimpers. These do a better job of crimping and are more reliable and consistent than pliers style crimpers. Ratchet crimpers are available as frames which hold a variety of crimping dies – which means that you actually have the proper tool for each type of terminal you are crimping! Many different models are available at different price points.
Astro Tools has a good reputation for quality and their 9477 set covers most types of terminals you will encounter. Add in a set of dies for Weatherpack/Metri-Pack and you are ready to go. Speaking of Weatherpack, you will also want a Delphi Packard crimping tool (especially valuable for crimping sealing rings onto the wire> as well as a Weatherpack pin removal tool and a Metri-Pack terminal removal tool.
Multimeter
You absolutely have to have a multimeter for working on cars. After years with cheap multimeters I finally treated myself to a decent automotive meter – an Actron CP7677. In addition to the usual volts, resistance, and current, this meter also measures RPM and dwell angle.
The best addition to a multimeter is a good assortment of Test Leads -or perhaps an assortment of good test leads – with probes, clamps, extensions, and alligator clips. Also valuable are jumpers and extensions which allow you to temporarily connect circuits.


Non-Insulated Connectors
At this point I was happy with the Weatherpack and Metri-Pack terminals but still didn’t like the insulated butt connectors and ring connectors – not even the heat shrink versions. I had read recommendations for non-insulated connectors so I decided to try them.
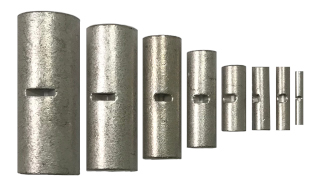
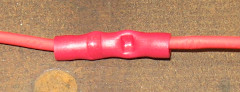
Non insulated connectors crimp better than insulated – with no chance of damaging the insulation – so this is a good starting point. After crimping you cover them with heat shrink tubing. Even better, cover them with marine heat shrink tubing, which is lined with an adhesive that melts and bonds to the wire for a water-tight seal. Marine heat shrink tubing is available in different colors, allowing you to match it to the wire. The end result is less bulky than insulated connectors and has a more professional look.
After using them for a while I’m sold on non-insulated connectors. About the only place I’m now using insulated connectors is for quick and dirty temporary jobs like building a test harness. You will be totally shocked that the best place I’ve found for high quality non-insulated connectors in reasonable quantities is Waytek…
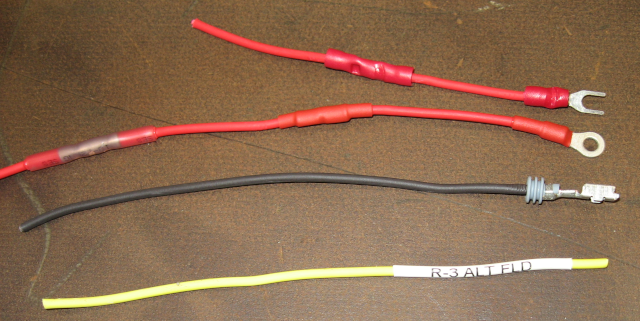
Top: Insulated butt connector and insulated spade connector.
- Middle (red): from left: insulated heat shrink connector, non-insulated butt connector with red marine heat shrink tubing, and non-insulated ring connector with red marine heat shrink tubing.
- Middle (black): Metri-Pack 280 female connector with ring seal.
- Bottom: heat shrink label.
Final Thoughts
While it has involved an investment it tools, connectors, and wire, I’m much happier with the results of my current wiring efforts. Using these tools and techniques produces wiring that is more reliable, has higher capacity, and is easier to work on than what shipped from the factory 60 years ago. In the past I was actually somewhat embarrassed about how my wiring jobs looked. Now I’m rather proud of how the Imperial is turning out. Even better, I’m no longer afraid to tackle new wiring or to troubleshoot electrical problems!
Next: instrument lighting problems in Electrical 12: Dash It All!