
After fixing the latest electrical gremlin in Electrical 12: Dash It All! it was time for something completely different.
I attended a four day intensive course on coachbuilding taught by Wray Schelin of ProShaper. What is coachbuilding, you ask? Good question! Coachbuilders build custom bodies for cars – think of custom Bugattis from the 1930’s or the handbuilt Ferraris and Jaguars from the 1940’s and 1950’s. These cars were handbuilt and either unique or low volume production.
Coachbuilding is the process – actually, the art – of transforming flat sheets of metal into complex and beautiful shapes. Also precise and functional shapes – the end result is a vehicle that has doors, windows, hoods, bonnets, boots, chassis, drivetrain, and fuel. It must go down the road while carrying people while also being art.
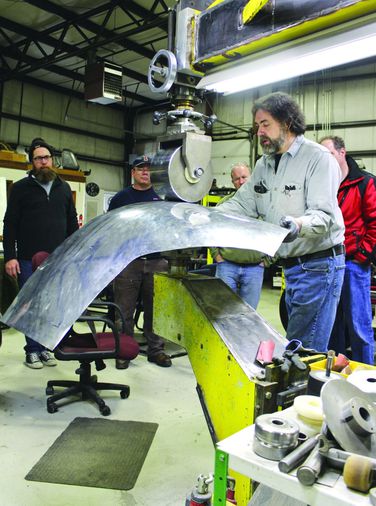
Metal Shaping uses a variety of tools and techniques to form metal. Surprisingly, very complex shapes can be created with a few simple tools. The starting point is often simply beating the metal with a variety of hammers. Next the parts are smoothed and refined on an english wheel. Edges are formed with a tipping wheel. Parts are cut to size with hand snips and precision fit with a hand grinder. Finally the parts are welded into place with a TIG welder.
All the tools needed to customize a car – or even build a complete body from scratch! – can be purchased for less than $2,000. Of course you can spend much more, but you don’t have to. Final results depend more on the skill of the coachbuilder than the size of the shop. Some Italian coachbuilders produced beautiful results with nothing more than a shed, a tree stump to beat on, an assortment of hammers, and a gas welder!
Demystifying Metal Shaping provides an excellent overview of the class and the process.
There were seven people in the class I took: a husband and wife from Florida, two people from California, one from Tennesee, and one from New Jersey. I was the only person from Massachussetts in the class. Everyone was interested in everyone else’s projects, so I was compelled to bring my Imperial to class on the second day.
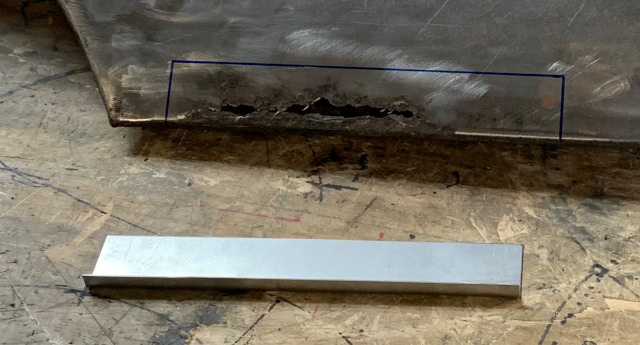
I didn’t work on the Imperial in class but did get some expert advice on how to proceed with rust repairs. I will tackle the rust and dent repairs this winter – will provide updates as I abuse the metal.
The class itself was almost brutal – 9:00am to 10:00pm for four days straight. After the first day everything was hands on working on projects. Since I am an out of shape slug I was completely wiped out at the end of each day…
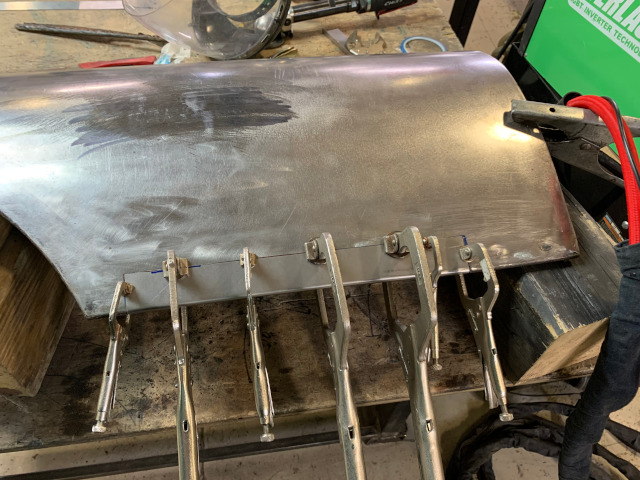
I worked on two projects in class. One was to help a classmate make a replacement aluminum skin for the trunk lid of a 1964 Alfa Romeo GTV. He had shipped in a mangled trunk lid from an aluminum racing car and wanted to repair the damaged frame and replace the skin. The other class project was to restore the front fender from a Jaguar E-type. It had rust damage and a dent, two of the most common problems in restoration.
The Alfa trunk skin required making a flexible shape pattern from the original trunk lid and creating the compound contours on an english wheel. The trunk lid curves both side to side and front to back – ideal for the english wheel. We were able to shape the skin in class but ran out of time working on repairing the frame – someone had cut large chunks out of the frame that had to be recreated from scratch.
Rust repair involves creating a patch panel that matches the curves of the car, cutting out the damaged area, fitting the patch panel to the newly created hole, welding the patch panel into place, and finishing off the welds.
After instructions on how to create and fit a patch panel I had the tightest fit of any patch panel I have ever made. Wray looked at it and said “it needs to be tighter but we can fix it up in finishing”. Ouch. The next one will be better!
Welding was done with TIG, rather than the MIG welder I’m used to using. The weld beads were much smaller that those produced by MIG, reducing the need for grinding. The TIG welds also grind easier than MIG, further reducing the need for grinding.
Welding causes the metal to shrink which introduces deformations in the rest of the panel – commonly bends or waves. Planishing is a process of pounding on the weld with a hammer and dolly to slightly stretch the metal and return it to its original shape. This is the first time someone has taught me how to planish. After working on the Jaguar panel I tried making a simple patch panel from two pieces of scrap. After TIG welding it together it was bowed across the weld. Planishing with hammer and dolly quickly straightened it back out – this technique actually works!

Dent repair is a four step process. First you identify high and low spots by darkening the surface with marker fluid and sanding with a flat block – this leaves the high spots shiny and the low spots dark. Then you bring up the low areas using a dolly and a slapper or slapping spoon. Third you bring down the high areas by heating, either with a torch or by using a shrinking disc. Wray recommends using the shrinking disc since it selectively heats the high areas and reduces them. Fourth is to repeat the first three steps until you have a perfect surface.
This is a lot of work but the results are beautiful.
I learned a lot in the class. As usual, the challenge will be to apply these lessons before I forget them. Now to see if I can get a TIG welder for Christmas…