
Searching Craigs List for a welding table a couple of years ago I stumbled across a triple drill press mounted on a heavy machine tool base. This machine tool base was 30″ x 60″, made of heavy steel (4″ thick at the ends), with a machined flat top surface – perfect for a heavy duty welding and fabrication table! I negotiated what I thought was a reasonable price and was told that for that price I could only have one of the drill presses. I hadn’t planned on taking any of the drill presses, but I checked them out and decided to take the best one.
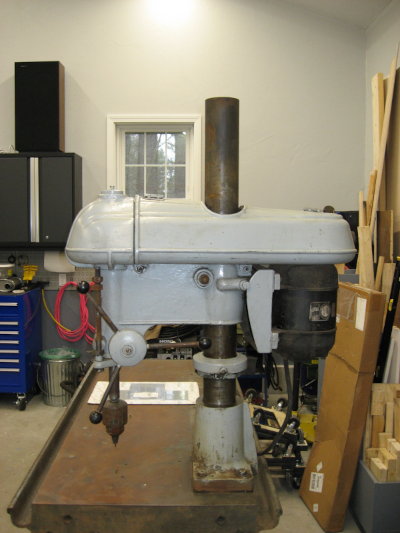
This drill press is an older Walker Turner industrial 1hp drill press which was designed to be run all day every day making large holes in heavy steel parts. Readily available consumer grade drill presses are designed for wood and run at high rpm and low torque. Metal drill presses like this Walker Turner run at low speed and high torque. It weighs around 300 lbs and requires three phase power.
First concern: does it work and is it worth saving? Everything moved smoothly without strange grinding noises, so it wasn’t rusted up. I put a dial indicator on the spindle and observed less than 0.003″ of runout – not great, but entirely usable. The motor requires 3 phase power, which is used in factories for high power electric motors. Homes only have single phase power, which is a problem. Fortunately there is a solution for this – a VFD, or Variable Frequency Drive, which converts single phase power into 3 phase power and also provides speed control.
A VFD was ordered and temporarily installed:
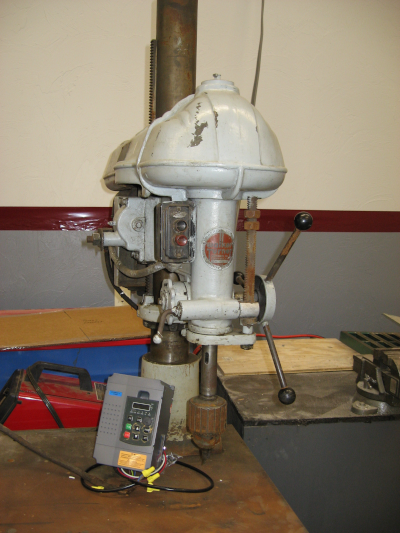
Fingers crossed it was plugged in and turned on… And worked perfectly! A bit of noise, but not bad. Incredible torque at low rpm – I couldn’t stall with anything I tried. This monster still has years of use left in it.
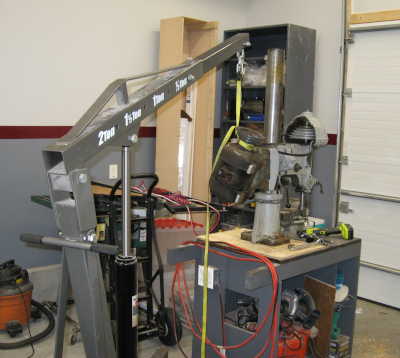
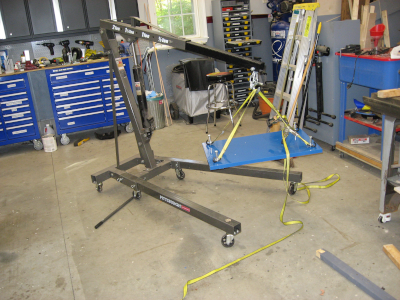
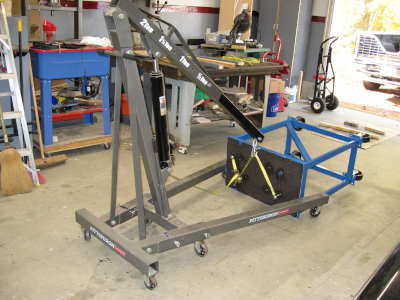
It couldn’t stay on the welding/fabrication table – not while using it as a table. So it came off and was temporarily mounted on a wooden cart while I started searching for parts to build a proper stand for it. The engine hoist was invaluable for handling the pieces – even broken down into three major subassemblies the parts were too heavy for me to lift!
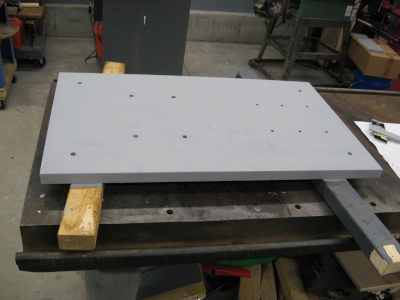
The first thing needed was a base to bolt the drill press to. I was looking for a 12″x18″ or 18″x24″ plate of 1/2″ steel. As mentioned other places steel is extremely expensive at the moment so I wanted a cheap used piece. After several months of searching an 18″x30″ piece of 1″ steel plate showed up on Craigs List. Complete overkill, so $140 later it was mine.
Next need was steel tubing for the frame. Perhaps something like what was described in the previous post…
Three elements drove the design of the drill press stand: the drill press itself, the base plate, and an existing tool box that I wanted to incorporate into the stand for storage. With all raw materials in place and a design roughed out it was time to start building!
Since multiple projects are planned a better way to cut the steel tubing to length was needed. Harbor Freight put their horizontal bandsaw on sale – the perfect tool for this task – so another power tool was added to the workshop.
The frame was fairly simple – a box with casters on the bottom and the 1″ steel plate on the top. Measure, cut, tack weld, test fit, adjust, full weld, grind, and the frame was ready to go.

The base plate needed many large holes which were measured and marked for drilling. The ~200 lb plate was wrestled onto the temporary cart and the Walker Turner fired up for its first real job. How did it work? Like the proverbial hot knife through butter. Not only did the drill press not strain when drilling 1/2″ holes through 1″ steel plate, it didn’t seem to even notice!
Well, not exactly 1/2″ holes… To be precise, 27/64″ holes which were then threaded with a 1/2″ – 11 tap for 1/2″ bolts. Half a dozen 3/8″ holes were drilled and tapped to secure a vise – planning ahead.
After painting the base plate was turned face down on the floor, the stand was placed on top, and the stand secured to the base plate with four 1/2″ bolts, The trusty engine hoist was then used to flip the drill press stand up on its casters.
With heavy drilling over for the time being, the drill press was removed from the temporary cart. It was cleaned and painted before being installed on its final home. A bracket was added for the VFD and final wiring was done. Two years after buying it the Walker Turner is ready for “production” use!
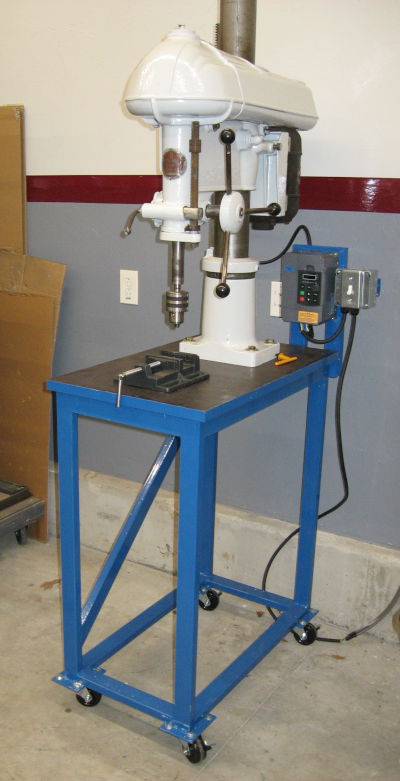
Those with sharp eyes may notice that the base of the drill press is empty… The tool boxes will be moved in as part of an upcoming workshop cleanup and re-organization. Those same sharp eyes may also notice that the casters look different. The original casters were too tall and were replaced with smaller casters.
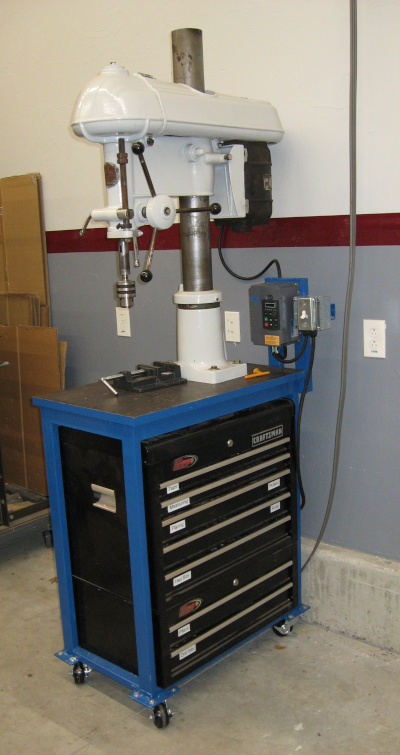
Update: Here is the drill press with the tool chests installed and loaded up with drilling accessories:
How Much Did It Cost?
There are several ways to answer this question:
For The Finance Office
It was free!
Hollywood Accounting
Charge everything against the drill press:
- $450 Drill Press (includes welding/fabrication table)
- $85 VFD
- $140 Steel Plate
- $220 Steel Tubing
- $350 Horizontal Band Saw (purchased for this project)
- $150 Drill Bits and Taps
- $60 Drill Chuck and accessories
- $45 Paint and supplies
- $60 Electrical Wiring
- $50 Consumables (grinding, etc.)
- $296 Mileage @ $0.52/mile
Total: $1906
Out of Pocket
Only count the out of pocket expenses directly used on the drill press. Tools that are used on other projects are considered part of general shop overhead.
- $0 Drill Press (included at no charge with welding/fabrication table)
- $85 VFD
- $140 Steel plate
- $40 Steel tubing (amount actually used for drill press stand)
- $60 Drill Chuck and accessories
- $30 Paint and supplies (amount actually used for drill press stand)
- $20 Electrical wiring (amount actually used for drill press stand)
Total: $375
Looking at what was actually spent on the drill press I’m going to say that this “free” drill press cost about $400 to get to a finished and ready to use state. Very reasonable for the capabilities of this machine!
Next project: a new Welding Cart.