
In AfterCoolin’ I put off tackling the last door by finishing work on the air compressor. After running out of excuses there was no choice but to move on to the last door.
While the bottom of the door looked good that unfortunately wasn’t definitive. One way to check sheet metal for rust is to probe it with an awl or screwdriver. If you can punch a hole the metal is rusty and needs to be cut out and replaced. The bottom and edges of door four were solid – a pleasant surprise. This meant that all I needed to do was clean and lubricate the window tracks, upgrade electrical wiring, and add the power window relays. Should be an easy one day job!
As I removed the window assembly I noticed what looked like a seam in the outer door skin. One that was tack welded in place with large gaps between the weld dots. Above this seam was a collection of dimples, divots, and dents in the door skin. Hmm, time for a closer examination…
And discovery that the door was solid because it had already been repaired.
Close examination showed that the bottom third of the door skin had been replaced and the bottom of the door extensively patched. There was clearly body filler on the door, but no way of telling how thick. Based on the evidence it looked like the door had rust and then had been hit. The rusty metal had been replaced and the solid metal hammered more or less back into place. Not a completely horrible job, but I wasn’t happy with it. Especially concerning was the partially welded seam. I couldn’t just leave it without knowing what was actually under the paint.
After muttering the appropriate lamentations and deprecations it was time to pull the door off the car and deposit it on the bench. The first step was to find out what I was really working with. Since the paint was hiding everything it had to go. My tool of choice was an 80 grit sanding disk on an orbital sander. After a couple of hours of work the door was down to bare metal and body filler. The body filler also needed to go, but was taking forever with the orbital sander. A coarse sanding disk on an angle grinder made short work of the old filler, at the cost of covering the entire workshop with a thick coating of grinding dust.
The good news was that the patch panels had been well fitted – tight seams with virtually no gaps. They just needed to be welded up. Back to the familiar routine – stitch weld, grind, look for pinholes, and repeat. After a few hours the seams were solid.

While the door was now solid, it looked horrible – dents, waves, ripples, and bulges. The seams weren’t flat, which meant the welds couldn’t be ground smooth. You can see some of the old body filler in dents above the weld – it was solid so I didn’t spend a lot of time trying to grind it out of the bottom of each small dent.
If this were a fender I would start working with hammer and dolly to get the entire surface flat – or at least close to it. Unfortunately the inner door skin greatly limited any hammer work. The surface was fairly close, so time to break out the body filler!
Checking the door with a straight edge showed where the lowest spots were. These low areas were filled with a thin coat of body filler and then worked with a body board and 36 grit sandpaper. A body board is an 18″ long by 2-12″ wide flat board with sandpaper attached. It allows you to get a flat surface across dents and waves and is the first tool in preparing for paint.
If the surface is flat everything will be evenly sanded with the body board. If it isn’t flat, the high spots will be sanded down and the low spots left untouched. When dealing with dents and valleys the high spots will be sanded to bare metal and the low spots left untouched. When this happens you add more filler to the low areas and sand some more.
I prefer to apply thin layers, so several applications were needed to get the entire door flat. At this point the surface is close to flat but has deep scratches from the 36 grit sandpaper. 36 grit is more for shaping than finishing. The next step is to apply a thin coat of filler to the entire door – 1/16 of an inch or so. This coat is worked with the body board with 80 grit sandpaper.
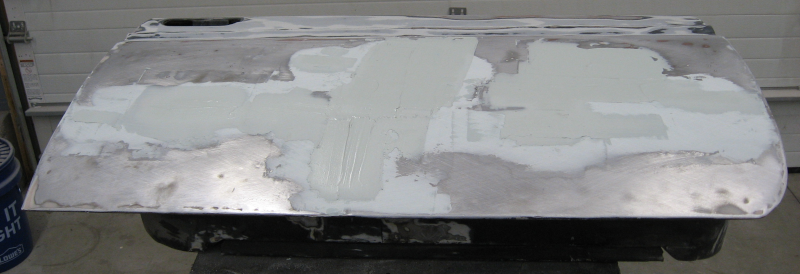
Here you can see the second coat of filler. If you look closely at the edges of the first coat of filler you can see how they have been feathered into the sheet metal leaving no visible transition. This is critical to a smooth panel in the final paint.
This is where you will start to use guide coats. A guide coat is a misting of black paint over the filler. If the surface is absolutely flat all of the guide coat will come off evenly when sanded with the body board. Low areas will be highlighted in black surrounded by body filler color. Scratches will show up as black lines. If you see any traces of the guide coat you need to continue sanding.
Once everything looks good with 80 grit you apply another guide coat and continue with 180 grit sandpaper. Additional thin coats of filler are applied as needed.
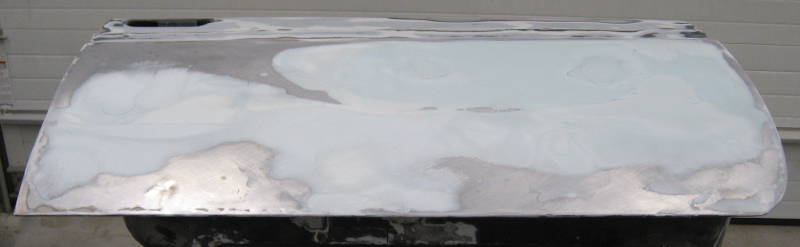
The end result is a flat panel. Bare metal indicates areas where the sheet metal is flat, lack of guide coat shows that the body filler is flat, and the translucent edges of the body filler show smooth feathering into metal.
While the panel is flat it isn’t ready for paint. The surface is finished, now it needs to be perfected. Two coats of epoxy primer are applied to the door to seal it and provide a foundation for the next step, followed by 2-3 heavy coats of high build primer. This high build primer is thinner than body filler and goes on smoothly. A guide coat is applied and the door is sanded with 240 grit sandpaper on a sanding block.
If some guide coat is left after sanding another coat or two of high build primer is applied and sanding continues. When you have a good surface with the 240 grit sandpaper, apply another coat of high build primer and sand with 320 grit. Once you are done with 320, give it a final sanding with 400 grit paper to eliminate sanding scratches. Yes, there are still 400 grit sanding scratches – but these are far to fine to telegraph through the final paint and will never be seen.
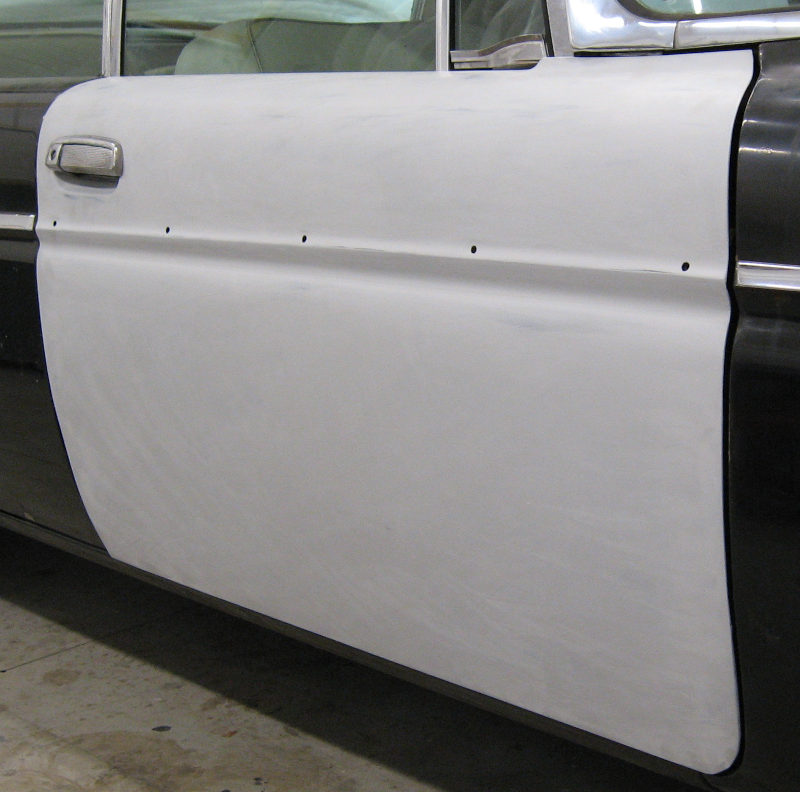
The end result of all this work is a perfectly flat and “laser straight” door that will not show any sanding scratches in the final paint – exactly what is needed for a black car! Black is the worst color for showing any imperfections in preparation. The saying in the automotive world is “if it is perfect, paint it black”.
This needed bodywork turned the door into a two and a half week job rather than the single day originally planned. To be fair other things happened during this time like adding bay curtains to the workshop, but it was still a lot of extra work.
Whoever did this door originally did a reasonably good job. The door was solid and looked good. I was quite happy to note that I did a better job on the other doors that I worked on – better fit and finish, more attention to details, everything butt welded instead of overlapped, patches trimmed flush even inside the door where they couldn’t be seen, and all supporting brackets replaced. Maybe there is hope for me! In addition the inside of the door was painted with epoxy primer, all seams were sealed, and sound deadening mat installed.
The worst part of all of this body preparation work? It has to be done to the entire car. All 64 acres of the body of this monster need the same tender loving care before it can be painted. Krud.
Next: More rust repair and paint prep in Hoodie.