
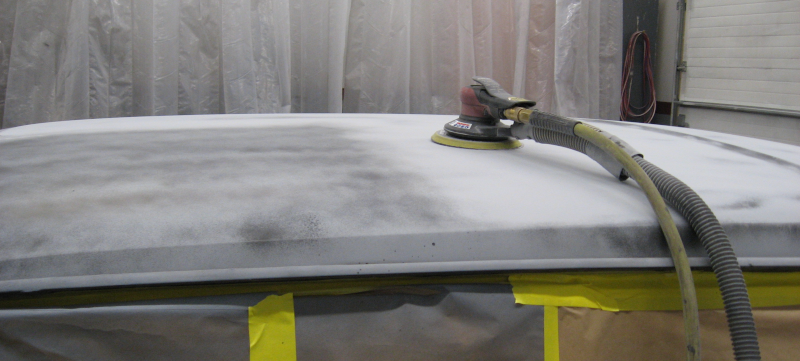
With the body work “finished” (more on that later…) in Wrangling Rust it was time to perfect the surface. In other words, spray on several heavy coats of high build primer and sand down the whole car with sanding blocks to produce a perfectly flat surface for paint. This is often called a block party because it goes a lot faster with several people working on it.
Block parties are universally loathed because this process is tedious, long, and frustrating. Further, since I’m an introvert, it is a party of one. As mentioned several times, the Imperial has about 63 acres of sheet metal – and each square inch has to be sanded to perfection. Multiple times.
I’ve had problems with high build primer in the past where I get thin coats instead of the thick coats you want. After searching I finally found the 1.7mm primer nozzle for the spray gun – the standard nozzle is 1.4mm in diameter, which is too small for this thick primer.
I always read the instructions before mixing up a batch of paint or primer to make sure I get the correct ratios of the various ingredients for each specific paint. This time I noticed something new – the paint instructions called for 30-40psi of air pressure, rather than the 20-22psi used with regular paint. OK, adjust the spray gun with the new large nozzle to 30psi, mix up a batch of high build primer, and spray a test panel.
WOW! What a difference! The spray gun laid down a smooth thick layer of the high build primer, exactly the way it was supposed to go. After allowing the primer to dry over night a guide coat was applied and the the miserable process of block sanding began. Yes, it was tedious, long, and frustrating.
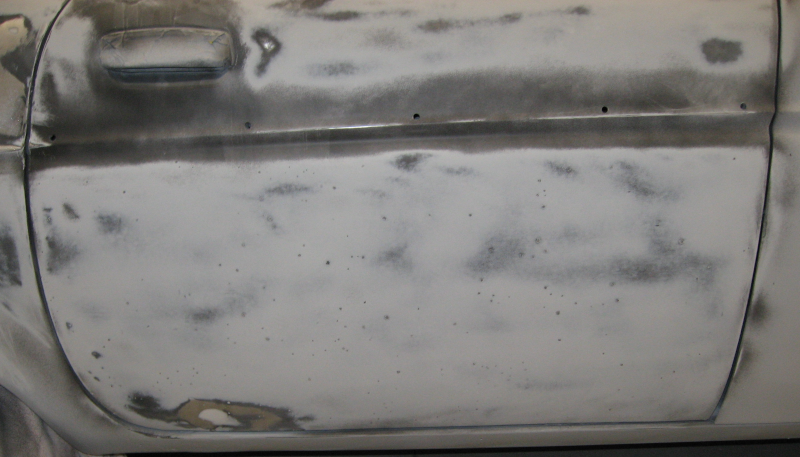
The results were quite encouraging. Overall the car is straight. The guide coat revealed several small dents, a few shotgun pits I had missed, and some areas around the body repairs that needed a little more attention. Glazing putty/finish putty filled in these areas and was sanded flush with the primer.
Ah, a miserable task completed! As I sat for a moment contemplating the car with a feeling of accomplishment three things came to mind.
- This is close but it could be better. The surface is smooth but not yet completely flat.
- I have more high build primer.
- I’m not very bright.
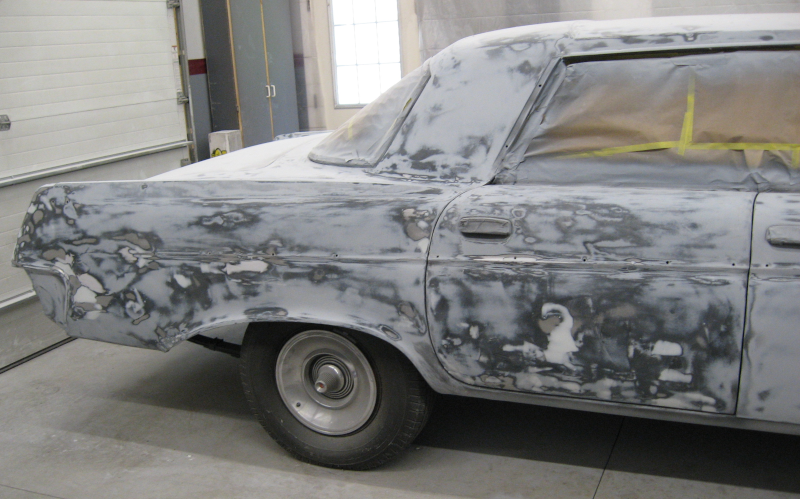
FINE. Set up the spray equipment, mix up another batch of high build primer, spray a heavy coat over the entire car (have I mentioned 63 acres?), clean up, and walk away muttering to myself about a total lack of intelligence and sense of self preservation.
Come back the next day and repeat the drill. Apply guide coat and then block sand until you see nothing but gray.
Hmm, this is coming out a lot better! The guide coat is sanding out, showing that there aren’t low spots. I’m not sanding through to bare metal – or even to the original coat of epoxy primer – so there aren’t high spots. In fact, it is sanding out to a surprisingly uniform coat of high build primer. OK, this was worth the extra work!
The last thing to do before spraying the final seal coat of epoxy primer was to peel up the weatherstrip around the trunk. You can guess what happened… Yup, major rust in the weatherstrip channel which allowed water into the trunk. It had been “repaired” by gooping (technical term) a lot of weatherstrip adhesive on the weatherstrip and sticking it back in place.
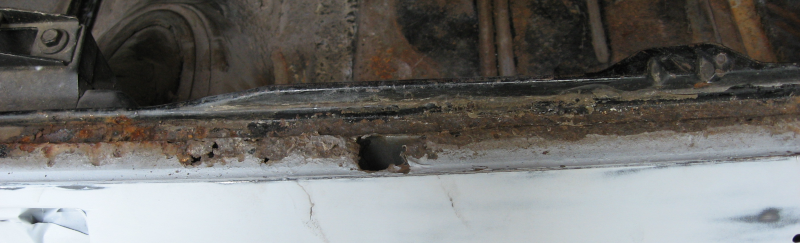

This is a bit tricky to repair – the weatherstrip channel is narrow and deep, making it challenging to cut and weld replacements. In addition to being narrow and deep, the corner is curved in two directions.
Sigh. Clean the painting and sanding supplies off of the work table, dig out the metal working tools, and drag out the welder. Start working from the center out and do it small piece by small piece. Make and re-make cardboard templates until one is good. Using the template, cut the repair piece out of sheet metal and bend to shape. Lay the replacement panel on the area to be replaced, mark around it, and cut out the bad metal. Put the replacement piece in place and tweak the replacement piece and the car until it fits. Tack weld the replacement piece in place and move on to the next one.
Once all of the repair pieces are tack welded in place and everything looks good, stitch weld all seams. Grind out the welds and stitch weld again between the previous welds. Repeat the process until all seams are solid. Stand back and admire a now solid and leak free trunk channel.
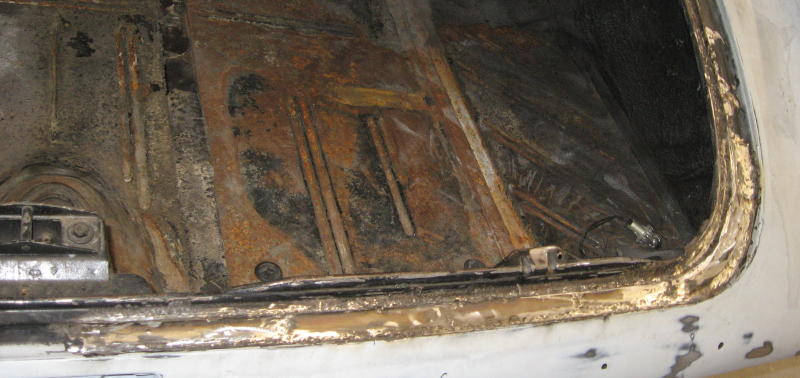
While the repair is solid it has (literally!) some rough edges. A bit of body filler, some quality time with various shapes of sanding blocks, and it looks great.
NOW, can I FINALLY FINISH THIS FREAKING JOB????
Vacuum the dust and grit off of the car and the floor of the workshop. Wash down the car with PrepSol, changing the cleaning rags frequently. Decide I wasn’t thrilled by the large amount of dirt on the rags, so wash down the entire car again.
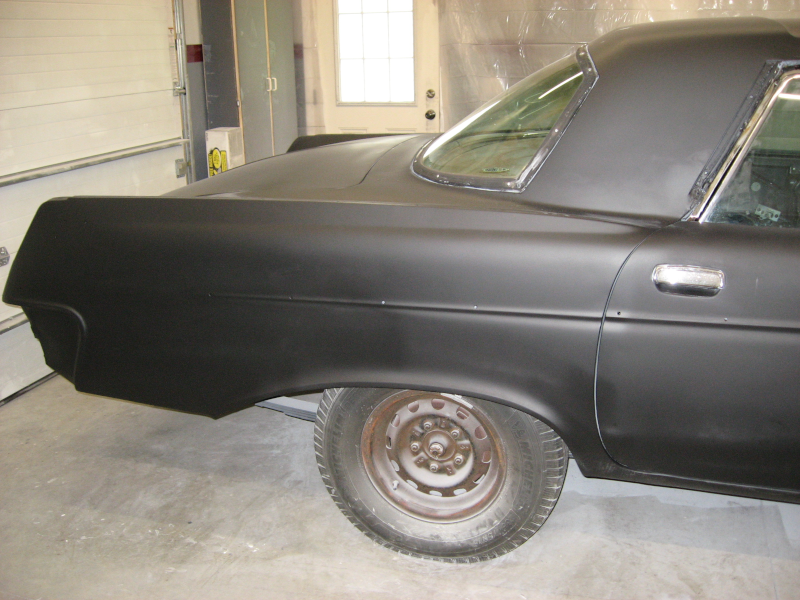
Mix up a batch of epoxy primer, then go over the car with a tack rag during the 15 minutes the epoxy primer is setting up. FINALLY spray the last coat of epoxy primer – spraying the entire car takes about 20 minutes. This last coat of epoxy primer is a seal coat – it seals the high build primer and provides a foundation for the final color coat.
As a side note. it is frustrating how a “paint job” involves hundreds of hours of preparation and tens of minutes of actual painting. And the quality of the final paint depends almost entirely on the preparation – while you can certainly screw up the final paint there is no way the final paint can hide preparation problems. There is probably some sort of life lesson here.
The outcome? Not bad. Not bad at all. The seal coat looks good which means the body looks good. All of the places on the car that bothered me have been addressed – rust, dents, shotgun pits, cracked paint, damaged paint – all have been fixed Now to get the actual color coat on the car!
I contacted the auto body shop about scheduling paint. I had originally spoken to them in April, thinking I would be ready in May. At that time they could fit me in. Now, in August, they are looking at a six week backlog. I should be able to get in around the middle of September. Hopefully. When I mentioned it took me about three months longer than expected to finish the job their comment was “yeah, that’s about right.”
Time to take a break and then get to other projects I’ve been putting off. She Who Must Be Obeyed has a list of house projects. Like converting a screened in porch to a three season room. I have things on my list – starting with cleaning the workshop to get rid of all of the paint and welding dirt. And, of course, planning the next steps on the Imperial. Like chrome. And interior. Maybe getting the HVAC system actually working. Hmm, perhaps some more electrical enhancements. The factory radio really needs to be upgraded. Oh, right, the transmission is still leaking Why am I suddenly feeling tired again?
Next: boat related trouble shooting of a Flat Mercury.