
With the paint finally finished the next step was to reinstall all of the trim on the car – all 873 pieces of it. There are three types of trim pieces on this car – steel (mainly the bumpers), cast pot metal, and stainless steel. Each requires different treatment.
The bumpers were straightforward – just bolt them into place with 1/2″ bolts. The only real challenged was wrestling these three ton parts into place long enough to get the bolts started. By myself… OK, maybe they are only 50-60 pounds, but that is still a lot heavier than it used to be!
The cast metal parts use threaded studs that screw into threaded bosses on the part. In the past I’ve used the double nut approach – screw two nuts onto the stud, tighten them against each other, and use this to screw or unscrew the stud into place. This works well, but it is time consuming and tedious.
Looking through the Bolt Depot website I happened to notice set screws. Just a minute – these are just like threaded studs, except that them come in various lengths and have a hex drive! They are also available in stainless steel at a reasonable price. OK, I need a couple of bags of these! They worked great; much easier to screw into the parts than threaded studs. The parts installed just like with the original studs. They should, since the only difference between the threaded studs and the set screws is the hex drive.
All in all the only real challenge with the cast metal parts was the cost of having them re-chromed.
The stainless steel side molding trim had been giving me heartburn for the last couple of years. These parts are formed sheet metal and are held in place with plastic clips. The 60 year old plastic clips break when you breathe on them – I broke practically all of them removing the trim from the car. And, of course, they aren’t available. Modern cars either don’t have trim like this, glue the trim in place, or use different styles of retainer clips.
Around two in the morning inspiration struck. A couple of weeks later I actually remembered it during the day: what about making a square tab out of sheet metal to fit in the mounting grooves in the trim pieces? Time to head out to the workshop and make some test pieces! Measurements suggested that 3/4″ would work. A piece of scrap sheet metal was cut to size and proved to fit perfectly.
This left the issue of attaching it to the car. Instead of a snap-fit plastic part, what about welding a bolt to the tab and securing it with a nut inside the car? Nope, wouldn’t work. The nut is too thick. Just a minute – what about a piece of threaded stud? Weld a stud to the tab, slip the tab into the trim piece, position it on the car, and screw on a nut from the inside. Well, would you look at that – works perfectly!
Counting mounting holes in the car told me that I needed to make about 50 of these mounting tabs, each exactly 3/4″ wide. With rounded corners. The threaded studs I had were too long, so I had to cut them in half and weld them exactly in the right place. Not looking forward to this!
Having a solution was good. Implementing the solution would be annoying. Just a minute – this is the kind of thing SendCutSend does! Hop onto the CAD system and design a 3/4″ tab. With rounded corners. And a hole in the center to locate the threaded stud. Hmmm, for this part the pricing is the same for mild steel and stainless steel… OK, stainless it is!
And then another thought struck – didn’t set screws come in various lengths? Yes, yes they did! Set screws were available in the 1/2″ length I needed. And stainless steel isn’t much more expensive than mild steel. OK, these mounting tabs are never going to rust.
I needed some way to hold the tab and set screw in place while welding them. Something that would hold the set screw perpendicular to the tab. Ideally something that would position the end of the set screw even with the back of the tab.
What about taking one of the chunks of 5/8″ steel plate left over from an earlier project and drilling a hole in it? Drill the hole just deep enough that the set screw will stick out just enough to locate a tab when you drop it over the screw. This locates and squares everything and the steel plate won’t be affected by welding heat.
So that is exactly what I did – mill one surface of the plate flat, drill a hole the proper depth, and start making trim retainer tabs!
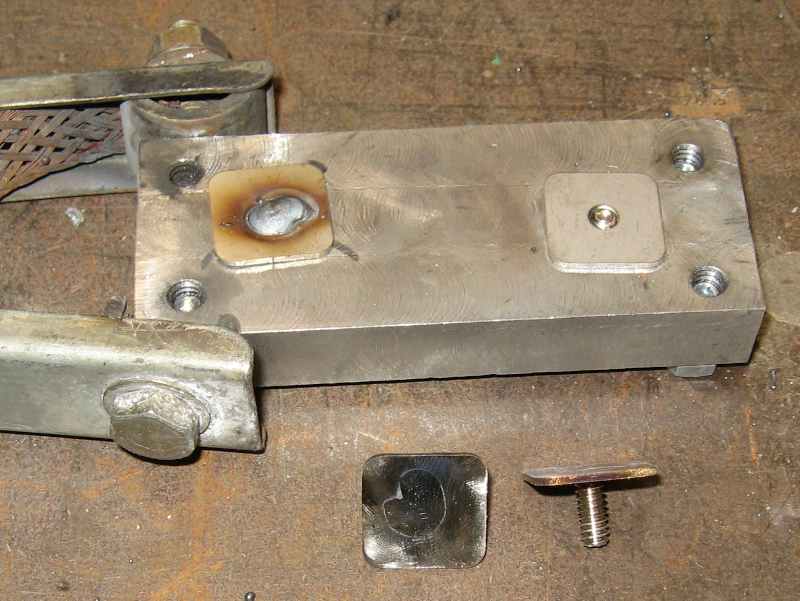
Top right: tab ready to weld to set screw. Top Left: Tab welded to set screw. Bottom Left: weld on tab ground flat. Bottom Right: Finished trim retainer tab. Note the ground clamp on the jig block – welding works much better when you remember to do this!
Being paranoid, I took the first half dozen retainer tabs and used them to test mount several different pieces of trim. They all worked so I went ahead and made the entire batch. There were several places where the trim originally used threaded studs and the 1/2″ studs I was using were too short. For these I made a set of retainer tabs with 1″ threaded studs.
Everything went together reasonably well. There were a few places where I couldn’t reach to get the nuts on, but the trim pieces were well secured with the ones I could reach.
The trim around the rear window was also stainless steel. It was wider than the side molding trim, and already used metal tabs and threaded studs. These tabs were wider and the studs were longer – 1-1/4″ vs. 1/2″ since they needed to go through the heavy rubber molding that secures the rear window. These studs were also smaller – 8-32 vs. the 10-24 studs used in the side molding. In addition, the studs were offset from the center of the tab.
Unfortunately 8-32 set screws don’t come in 1-1/4″ length. But bolts do… Fine, order a bag of 1-1/4″ bolts and cut the heads off!
Most of the old tabs had rusted out. Fortunately there were enough good ones that I could take measurements. Hop back onto the CAD system, design these tabs, and include them in the same SendCutSend order as the side molding tabs.
The welding fixture worked really well for the side molding tabs, so it was modified for the rear window tabs. In addition to needing a smaller hole it needed some way to control the length of stud sticking up from the top of the block. Four screws to a great job of providing this adjustment.
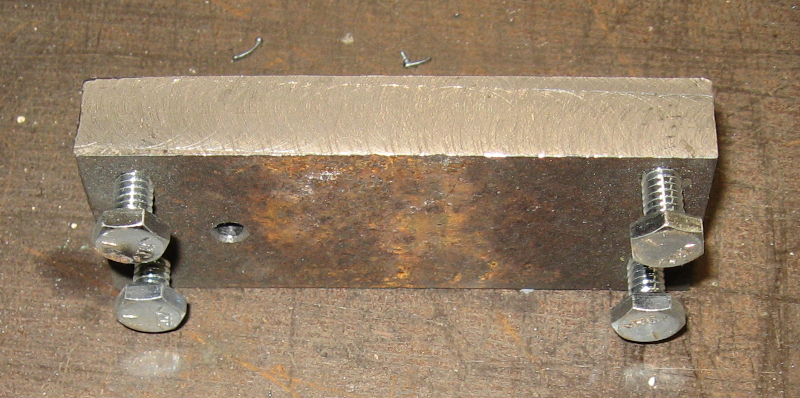
A few minutes of adjustment and the new trim tabs were welded up and ready to go.
While the stainless steel trim itself was in good shape, it had 60 years of exposure to the elements. Metal polish on a felt pad in a die grinder brought it back to a factory fresh luster.
All of the trim is back on the car and looking good. I think I’m ready for the first Cruise Night of the year!