
Today is a new day. Returning to the debacle of the seat cover that doesn’t fit the first thing is to cast aside all assumptions and do a systematic trouble shooting of everything.
The first thing I discovered is that the sides of the seat aren’t at right angles to the front – they are actually at 83 degrees, not 90 degrees. OK, that makes a difference. There is an inward jog at the back of the seat. OK, that needs to be included in the template
While the factory seat covers aren’t suitable for making templates they can give you a rough idea. Working against the seat frame I had made the corners with a 3″ radius. Looking at the original covers they had a much larger radius.
But how to make a large radius? Well, the drafting set I’m using (a professional set from my days as an aerospace draftsman) has an extension bar for the compass. Let’s make circles with radii from 5″ to 10″ , cut them out of cardboard, and see which one fits best. After trying all of them it looks like an 8″ radius is the best fit.
Taking this information we create a new template.
As long as we have the seat backs mounted on the base let’s mark the foam with the edges of the seat backs and the seat inserts. We can then use this to fit the top seat cover and precisely locate the seat inserts and center panel.
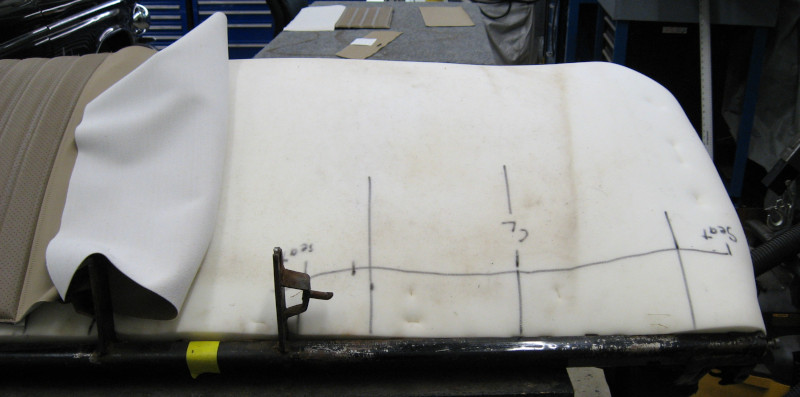
With this information we can position the seat inserts, add filler strips on the outside edges, and determine the exact size for the center panel between the inserts.
Based on the new template I was able to save and re-work the seat inserts – all other pieces had to be discarded and done from scratch. This wasn’t completely bad – the inserts required the most work to make so I was glad to be able to use them. All of the other pieces were simply cut out and sewn together.
The new template is used to mark the outside edges and the radius for the corner. This corner radius goes into the insert, so the insert is trimmed to fit. After the entire top panel is sewn together it is draped over the seat base and test fitted.
The front and sides were made using the original front and sides as templates. Despite the problems with the first seat cover these pieces seemed to fit OK, so we will use the same templates to make the new ones. To correct the problems with the seam we sew the front and side panels together and pin them in place on the seat base and foam. We then use the edge of the side and front to mark the top panel, add seam allowances, and mark this on the top panel. Hopefully this will give us a consistent seam around the entire seat rather than one that dips around the ends.
Taking a deep breath, sew the top and sides together. With considerable trepidation test fit the new cover.
And it fits! Maybe not perfect, but much better than the first cover.