
In yet another demonstration of a lack of common sense I decided it was time to tackle the front door cards.
Unlike the replacement hardboard panels on the rear doors, the front doors still had the factory door cards. These were made from a cardboard like compressed paper material. Which was fragile when new. It doesn’t age well. If exposed to water it basically falls apart. I’ve been afraid to touch it…
But the job has to be done. Sometime. Sigh, it looks like sometime is now….
Pop the first door card off and plop it on the workbench. Carefully take the arm rest off. The Imperial has a trim piece directly above the arm rest – an aluminum sheet with a sort of floral pattern and a chrome plated metal surround. This was also carefully removed.
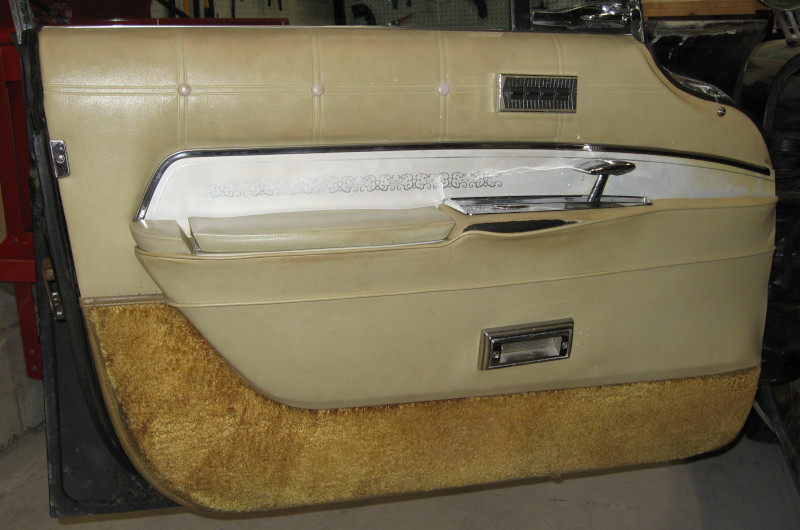
The first view of what we have to work with is a bit of a mixed bag:
The first thing you can see is the (f)ugly carpet along the bottom of the door. This absolutely has to go. What was Chrysler thinking???
The second is that the door card is molded – you can see how the trim panel is partially recessed. This means that you will have trouble fitting things back together if you replace the factory panel with a flat piece of hardboard. This explains some of the challenges I had with the rear door cards. OK, I really need to save the factory pieces.
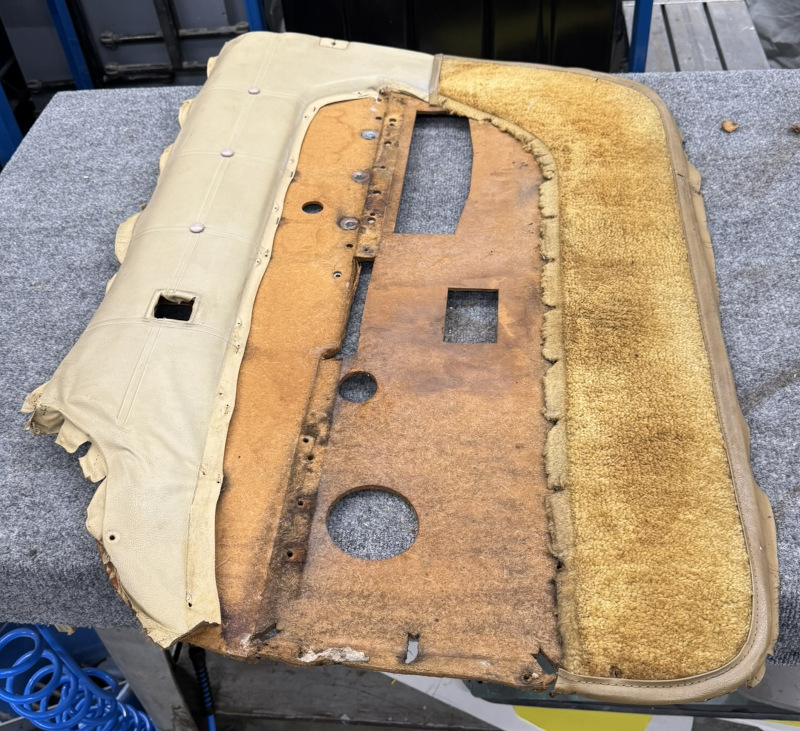
Time to carefully peal the old vinyl and carpet off. A heat gun softens the old adhesive and minimizes damage.

I’ve seen worse… It is actually in reasonably good shape except for the holes around the edges for the mounting clips. If I’m careful installing it should be OK.
The initial steps are like the rear door cards: cut and fit 1/4″ SewFoam to go over the whole panel. Double stitch the foam to the vinyl in 6″ squares – making sure that they line up with the stitching on the back doors. Spray the door card and cover with spray adhesive, fit the cover to the door, and staple on the back. The fit around the molded indents wasn’t great – but the arm rest and trim panel would pull everything into place.
The first major difference is the aluminum trim panel. These were worn and dirty. And ugly from the factory. Again, what was Chrysler thinking? I considered covering them with a nice walnut veneer. This would look rich – it was what Chrysler should have done in the first place.
I ultimately decided to just use some of the darker vinyl – I was already using it other places for accent. A round of spray adhesive, some fitting and trimming, and the updated trim panels were ready to go.
On the rear door cards the mounting of the arm rest and trim panels was a mystery. On the front doors taking them apart showed all of the mounting hardware and tricks.
First was to position the aluminum trim panel and the chrome trim. The chrome trim had a series of “nails” sticking out the back when went through holes in the door card and were then bent over. The arm rest used a combination of nuts and bolts, sheet metal screws, and the “nails”.
There was a bit of fiddling to deal with the thicker foam backed vinyl, but everything eventually went together. The last step on the workbench was to carefully install the retaining clips around the edge.
Time to cross my fingers, cart the refurbished door card over to the car, and attempt to install it. After a few gyrations the door card clipped into place. Install the courtesy light into the door and verify that it works. So far, so good. The last step was to install the power window switch and see if the window still goes up and down.
The window goes up. The window goes back down. The window goes up again. The door closes. The door opens. The door closes again. And there was much rejoicing!
Spend a few minutes admiring my work. Then on to the remaining door.
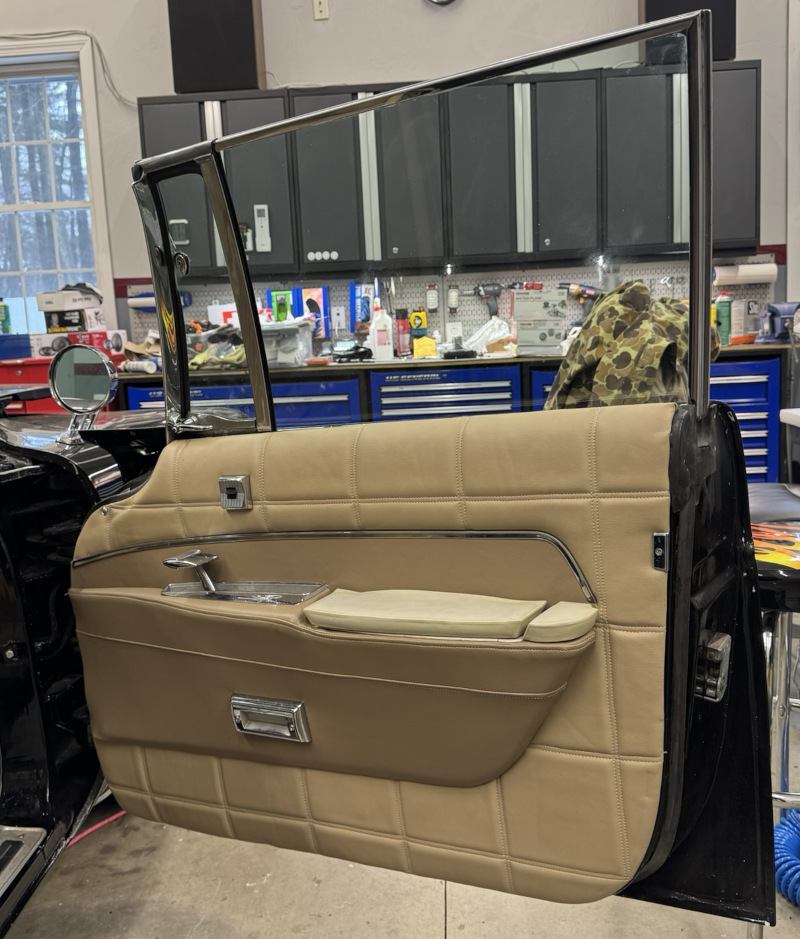
I’m rather happy with how this turned out! The old fiberboard held up better than I expected. The trim panel above the arm rest adds a nice bit of contrast. Walnut would have been nicer, but this is fine. This task went better than I expected going into it – always good when that happens! I’m beginning to look forward to cruise nights this summer.