
In the previous article on Workshoppery the workshop was insulated, sheetrocked, and painted. With the walls finished it was time to start on storage. Actually storage and organization – I need to not only store things but to be able to find them, to get to them during projects, and to easily return them to organized storage. Ongoing pain points included storage for large items, tool and supplies storage, and materials storage.
I also wanted a few luxury features: a good sound system and a computer that were protected from shop dust and grime.
The Big Cabinet
Big shelves and deep shelves are required for a lot of the tools, materials, and collections I have. However, big and deep shelves mean things shoved to the back where they are difficult to find and access. Plus open shelves allow shop dust and grime to get all over everything.
The answer is a big cabinet with half shelves and half drawers. Big means 8 feet high, 4 feet wide, and 2 feet deep. With doors!
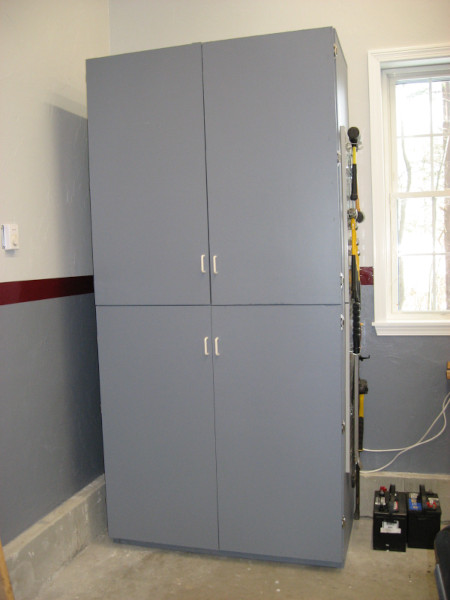
The bottom half is drawers and the top half is shelves. Two of the drawers are designed for stereo and laptop computer.
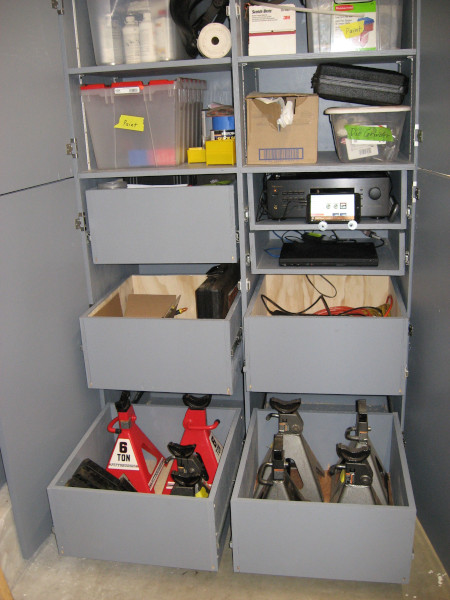
This was the first time I had built drawers and was “a bit of a learning experience”… The cabinet and drawer sides are made of 3/4″ plywood. The drawer bottoms are 1/2” plywood set into routed grooves. This is probably overkill (hey, there’s a first time for everything!), but these will be heavily loaded. The drawers use full extension heavy duty slides, allowing them to be pulled out completely so that you can get to the back.
The jackstands in the botom drawers have been a nuisance for a long time – they are one of the reasons for building this cabinet. These jackstands weigh 15-20 lbs each. They are in the way, easy to trip over, and painful to kick. I can now get to them easily when I need them and store them out of the way when I don’t.
The laptop is in a pull-out drawer where it is easy to get to when needed and protected from the rest of the shop when not in use. The laptop is a 12 year old unit that still works fine for browsing the Internet and looking up things when needed.

Building this cabinet was a big project but it turned out great – after fixing my various “learning experiences” along the way. Note that if a drawer slide is installed crooked in the cabinet, nothing you do to the drawer will make it fit any better…
Main Workbench
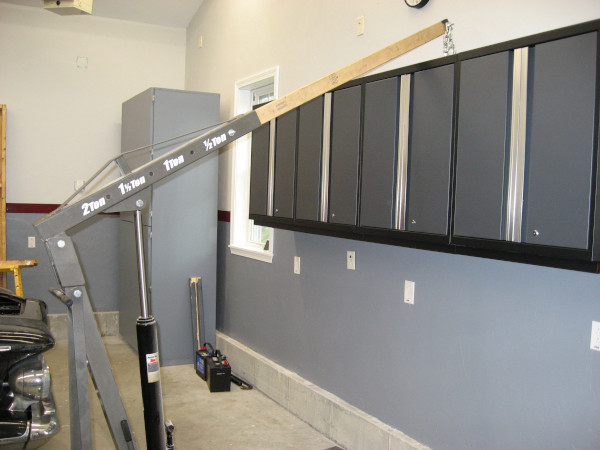
The goal is to have a Steevo Bench, which is named after a build thread on the Garage Journal website, with cabinets above. I’m part way there, so this is a snapshot.
Garage Journal is a truly evil website which has cost me quite a bit of money. Based on feedback of many people I decided that I wanted New Age Pro cabinets. The cabinets went on sale around Thanksgiving and four of the tall wall cabinets somehow showed up in my driveway. That’s not going to do anyone any good, so they needed to be moved to the wall!
I discovered that these are indeed high quality cabinets made out of heavy gauge steel. Which means that they weigh about 80 lbs. Each.
The good news is that they come with wall brackets that you bolt to studs, hang the cabinets from the brackets, and then bolt the cabinets themselves to the studs. I had already planned out this job, so I hung the cabinets from the handy engine hoist, raised them to the needed height, and observed the front legs of the hoist hit the wall while the cabinet was still a foot away.
The lifting point on an engine hoist is behind the front wheels. This is necessary to keep the back of the hoist from coming off the ground when lifting heavy objects. If you are lifting light objects you don’t need the hoist…
Time to add an extension to the hoist. Trying various available materials I discovered that a 2×3″ stud fit perfectly into the main tube of the hoist. Dig a 6′ piece of 2×3 out of the materials pile, bolt it to the hoist, and bolt the lifting hook from the hoist to the end of the stud. This worked perfectly to lift each cabinet to the needed height, position it, slip it over the brackets, and gently lower it into place.
The plan was to build a ten foot workbench with a 1/4″ steel top around two 44″ Harbor Freight tool cabinets. I had been waiting for the Black Friday sale to get the tool cabinets. Unfortunately they only had one in stock, so I now have one cabinet in the workshop and one cabinet on order.
Working up the parts list for the workbench I discovered that steel prices are quite high. Some research revealed that there is a major shortage of steel right now, causing near record high prices. Yes, another COVID-19 impact. Steel supply is expected to catch up with demand in the first quarter of 2021, so I decided to put off the workbench until prices go down.
Another thing I wanted for the workbench was some pegboard on the wall – but I wanted something better than regular pegboard. Wall Control makes steel pegboard that looks good, so I ordered enough to go under the wall cabinets and on the big corner cabinet.
This brings us to where we are today:
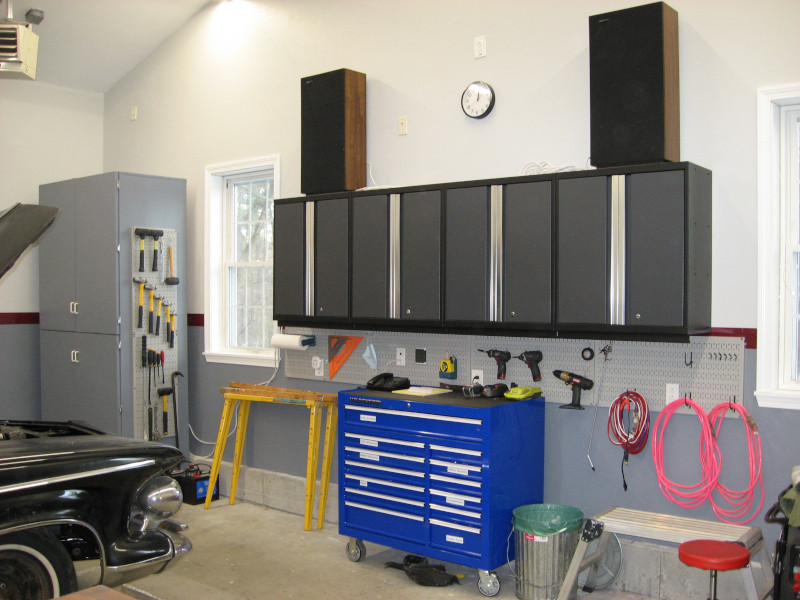
The speakers are some 35 year old Boston Acoustics A150s that had been in the basement for years. They sound great but were too big and had been replaced with smaller speakers. I had been brainstorming various types of wall mounts for them but then realized that these heavy duty cabinets will work just fine to hold them up.
The receiver shown in an earlier picture is an old Nakamichi AV8. It sounds great but became obsolete when HDMI replaced S-Video for TV equipment. It had also been in the basement for years. The tablet is an old HP tablet that supports Micro-SD cards – throw in a cheap 64GB SD card and it holds an entire music collection. No, the tablet wasn’t in the basement. It was in the bottom of a desk drawer. The result is a “free” workshop sound system with considerable authority.
Materials Storage
Materials storage ranging from 4′ x 8′ panels of plywood and steel to 8′ studs to shorter and smaller pieces of wood and metal has been an ongoing problem – they were scattered all over the place, piled in inconvenient places, and always in the way. One of the construction projects was to build storage for these.
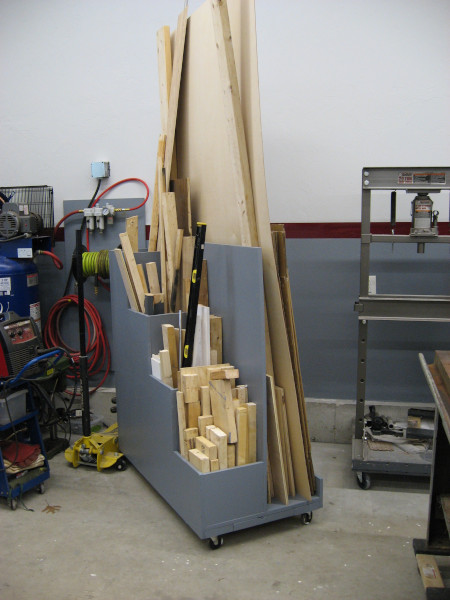
This cart stores a wide range of material, rolls to where it is needed, and can be placed in an out of the way location. I’m no longer tripping over scrap, looking for pieces I might or might not have, or fighting large sheets!