
In Electrical 8: RTFL I fixed a stupid mistake in connecting the new wiring harness, allowing me to get back to things that actually improve the car. I’ve described how much of the original factory wiring is too small and what the new wire harness does to include heavier wire – for example, replacing a single 14GA wire for all four headlights with a separate 12GA wire for each of the four headlights.
Most of the wiring so far has involved 16GA, 14GA, 12GA, or 10GA wire. This wire is available in multi-color bundles from places like Wire Barn. Electrical fittings, terminals and connectors are readily available, as are crimping tools.
Wire heaver than 10GA gets expensive, requires special tools for crimping, and is harder to work with in general. It is needed in fewer places, making it less attractive to keep a stock of heavy gauge wire. The easiest way out is to order finished individual wires from places that specialize in this.
I’ve had good lock with Genuine Dealz, so I figured out what wires I needed and placed an order. I have no idea where the name comes from, but they have a good reputation for building high quality cables. They utilize marine grade wire, which is solid copper wire with the individual strands coated with tin – this makes the wire much more corrosion resistant than uncoated wire. It is also more expensive, but “buy once, cry once” applies. They can crimp a variety of connectors on the wire and cover then ends with marine grade heat shrink tubing – this is heat shrink tubing that has an adhesive lining which makes the connections water tight.
Genuine Dealz has a very nice web ordering system: you specify the gauge of the wire, the color, and length. You then specify what fittings you want on each end and whether or not you want heat shrink tubing on each end. The system interactively calculates the price at each step along the way. Prices are quite reasonable for what you get.
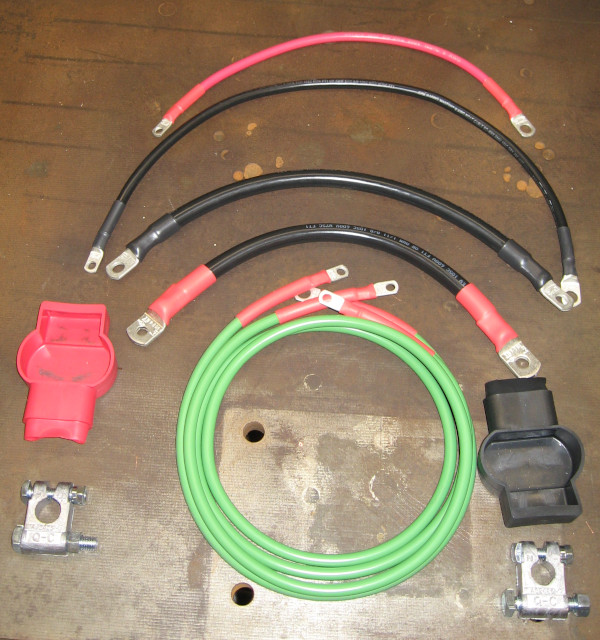
The alternator got a major upgrade: The original alternator wiring consisted of a 12GA wire going to the ammeter in the dash, and another 12GA wiring going from the other side of the ammeter to the battery. With the new wiring harness this was temporarily changed to a 10GA wiring going directly to the battery. This was probably adequate, but it is being replaced with 6GA (the green wire in the picture above).
An interesting aspect of alternator wires is that they include a fusible link. This is basically a fuse built into the wire. It is needed because a failure mode of alternators can cause them to start producing several hundred amps of power. Another failure mode causes a direct short to the battery, with all the power the battery can produce flowing through the alternator wire. Either way you are looking at the potential for considerable damage to the electrical system and a likely fire. Instead of this happening the fusible link will burn out like a fuse and protect the rest of the system.
As an alternative to a fusible link you can add an actual fuse to the alternator circuit – typically an 80 amp or 100 amp fuse for a 60 amp alternator. Or you can add a circuit breaker, which is what I did. An 80 amp marine circuit breaker is water proof and can be reset if there is a problem.
After placing the order I got a call from Genuine Dealz: it appears that they are having trouble getting wire in all colors. I wanted orange for the alternator wire but they didn’t have that. So I ordered green and then covered it with the black woven sheathing I’ve been using for the rest of the harness.
The next step was to replace the 10GA wire from the battery to the Fuse/Relay box with, you guessed it, a 6GA wire. The power bus in the Fuse/Relay box is rated for 80 amps, which would be a bit much for the 10GA.
The 10GA wire from the negative battery terminal to the chassis frame ground was also replaced with 6GA.
This took care of the light wiring. The factory 4GA cables for the starter motor were upgraded to 1/0. Between these very heavy 1/0 cables and a battery capable of putting out over 1,000 amps I don’t expect to have problems starting the 413, even when it is hot!
The last touch was the actual battery terminals. Standard battery terminals don’t work well when adding more wires to them and tend to be weak – I actually broke the old positive terminal clamp from the multiple connect/disconnect cycles during this wiring upgrade.
Military battery terminals are made for just this use case. They are much heavier than standard terminals and have separate heavy 3/8″ bolt for connecting multiple cables to a single terminal. They were an obvious upgrade for the battery connections to support the new heavy duty wiring.
With all the upgraded wires installed it was time to connect the military terminals to the battery and see if things worked. After double checking the new wires – it would “embarrassing” to find out how the new 6GA cables hold up to the 1,000 amp battery… Nope, no ground wires were connected to the hot side of the battery.
Almost everything worked… Everything but the headlight HI beams. LO headlights worked fine but high beams were dead. Sigh. OK, dig out the voltmeter and start trouble shooting.
Bad relay? Swapping relays didn’t do anything. OK, pull the HI beam relay and check voltages. Supply voltage was good – but no voltage on the signal line from the HI/LO switch. Hmm, this was odd… I hadn’t touched anything that would produce these symptoms.
Or had I? I had removed the 22 pin main bulkhead connector to get extra slack on the wiring when working on the fuse/relay box. After pulling the bulkhead connector back off I noticed that the pin for the HI beam looked odd. Like it had been crushed…
Apparently I wasn’t careful enough with the bulkhead connector. Pull the HI beam pin out, replace it, and put the bulkhead connector back together. Carefully re-install the bulkhead connector and then check the headlights. LO beams – still good. HI beams – all four headlights now working. And there was much rejoicing!
Time for a test drive. All the gauges are working and the rest of the electrical system checked out. Check off another project completed!
Next: fighting charging system problems in Electrical 10: 2 Bad.